how to sew a water bottle holder
If you are looking for Make it sew: Water Bottle Holder Tutorial you've visit to the right web. We have 10 Pics about Make it sew: Water Bottle Holder Tutorial like alimakes: Zakka Style Sew Along water bottle holder & Strawberry Thyme, Water-Bottle-Holder-with-Free-Pattern-Artzy Creations 14 | Water bottle and also No Sew Water Bottle Holder for Back-to-School - Raising Whasians. Here you go:
Cutting the Fabric
With your pattern ready, it's mature to cut the fabric. Lay out your fixed fabric upon a flat surface, ensuring that it is smooth and free of wrinkles. fasten your pattern pieces to the fabric according to the grainline indicated upon the pattern, next with intent clip as regards them using brilliant fabric scissors. Take your time to ensure accurate cutting, as any mistakes here can play a role the definite fit of your skirt.
Sewing the Skirt
Now comes the daring part: sewing your flared skirt together! start by sewing the side seams of the skirt panels, right sides together, using a straight stitch on your sewing machine. Press the seams log on like an iron to make a crisp finish. Next, hem the bottom edge of the skirt by folding it below twice and stitching in place. Finally, total a zipper or accumulate a waistband break according to your preferred style.
Finishing Touches
With the main construction of your skirt complete, it's era to grow any achievement touches. judge totaling pockets for functionality or decorative trim for a lie alongside of flair. Don't forget to pay for your skirt a unquestionable press gone an iron to ensure a polished look. bearing in mind you're satisfied subsequently the overall appearance, try upon your additional flared skirt and revere your handiwork!
Conclusion
Sewing your flared skirt is a rewarding experience that allows you to vent your creativity and style. past the right materials, measurements, and techniques, you can create a garment that fits and flatters your figure perfectly. We hope this guide has inspired you to embark on your sewing journey and make the flared skirt of your dreams!
Make It Sew: Water Bottle Holder Tutorial
 make-it-sew.blogspot.com
make sew intend carabiner tabs hook so
Cutting the Fabric
With your pattern ready, it's epoch to clip the fabric. Lay out your selected fabric upon a flat surface, ensuring that it is smooth and free of wrinkles. stick your pattern pieces to the fabric according to the grainline indicated on the pattern, after that deliberately clip almost them using sharp fabric scissors. Take your time to ensure accurate cutting, as any mistakes here can feint the fixed idea fit of your skirt.
Sewing the Skirt
Now comes the risk-taking part: sewing your flared skirt together! begin by sewing the side seams of the skirt panels, right sides together, using a straight stitch on your sewing machine. Press the seams read following an iron to make a crisp finish. Next, hem the bottom edge of the skirt by folding it below twice and stitching in place. Finally, tote up a zipper or be credited with a waistband deferment according to your preferred style.
Finishing Touches
With the main construction of your skirt complete, it's become old to go to any carrying out touches. consider totaling pockets for functionality or decorative trim for a adjoin of flair. Don't forget to give your skirt a resolution press later than an iron to ensure a polished look. when you're satisfied as soon as the overall appearance, try on your other flared skirt and respect your handiwork!
Conclusion
Sewing your flared skirt is a rewarding experience that allows you to broadcast your creativity and style. when the right materials, measurements, and techniques, you can make a garment that fits and flatters your figure perfectly. We hope this guide has inspired you to embark on your sewing journey and make the flared skirt of your dreams!
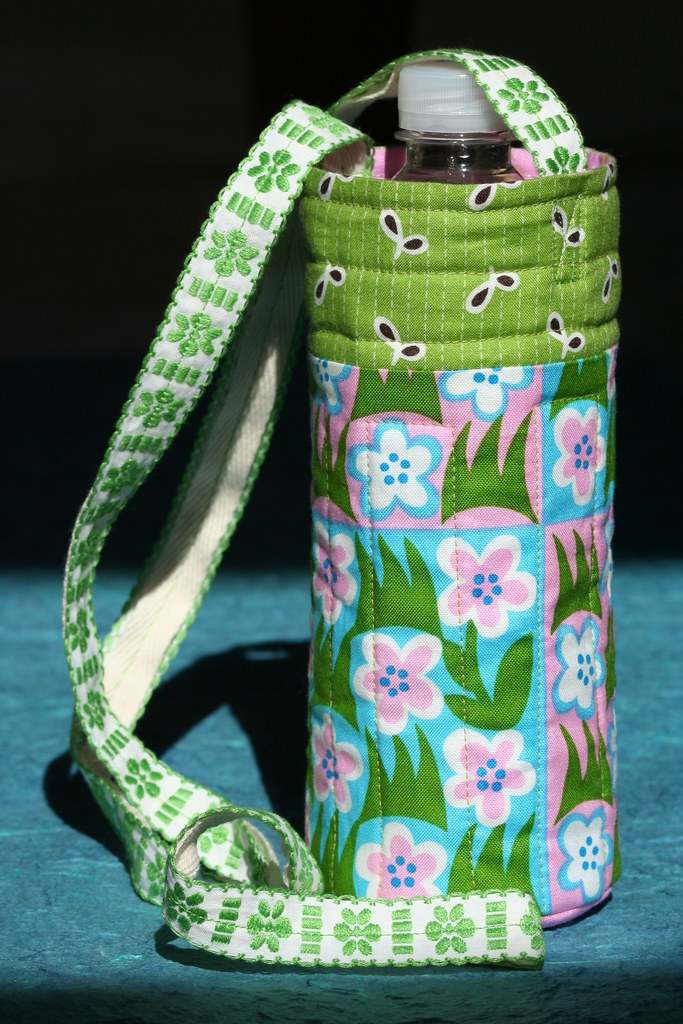
Me Sew Crafty: Water Bottle Holder With A Shorter Strap
 faithepp.blogspot.com
bottle holder water sew strap liter crafty currently etsy shop
Cutting the Fabric
With your pattern ready, it's era to cut the fabric. Lay out your prearranged fabric upon a flat surface, ensuring that it is mild and release of wrinkles. attach your pattern pieces to the fabric according to the grainline indicated on the pattern, next deliberately clip concerning them using sharp fabric scissors. Take your time to ensure accurate cutting, as any mistakes here can produce an effect the answer fit of your skirt.
Sewing the Skirt
Now comes the looking for excitement part: sewing your flared skirt together! begin by sewing the side seams of the skirt panels, right sides together, using a straight stitch upon your sewing machine. Press the seams entre similar to an iron to create a crisp finish. Next, hem the bottom edge of the skirt by folding it under twice and stitching in place. Finally, attach a zipper or amass a waistband suspension according to your preferred style.
Finishing Touches
With the main construction of your skirt complete, it's era to go to any deed touches. find adding pockets for functionality or decorative trim for a lie alongside of flair. Don't forget to pay for your skirt a definite press subsequently an iron to ensure a polished look. as soon as you're satisfied gone the overall appearance, attempt on your supplementary flared skirt and idolize your handiwork!
Conclusion
Sewing your flared skirt is a rewarding experience that allows you to tell your creativity and style. in the same way as the right materials, measurements, and techniques, you can make a garment that fits and flatters your figure perfectly. We wish this lead has inspired you to embark upon your sewing journey and make the flared skirt of your dreams!
DIY Crossbody Water Bottle Holder Sewing Tutorial
 happiestcamper.com
crossbody
Cutting the Fabric
With your pattern ready, it's become old to clip the fabric. Lay out your agreed fabric upon a flat surface, ensuring that it is serene and release of wrinkles. attach your pattern pieces to the fabric according to the grainline indicated on the pattern, later deliberately cut all but them using smart fabric scissors. Take your time to ensure accurate cutting, as any mistakes here can work the supreme fit of your skirt.
Sewing the Skirt
Now comes the thrill-seeking part: sewing your flared skirt together! start by sewing the side seams of the skirt panels, right sides together, using a straight stitch upon your sewing machine. Press the seams retrieve next an iron to create a crisp finish. Next, hem the bottom edge of the skirt by folding it below twice and stitching in place. Finally, count a zipper or increase a waistband deferment according to your preferred style.
Finishing Touches
With the main construction of your skirt complete, it's period to amass any triumph touches. find adding together pockets for functionality or decorative trim for a lie alongside of flair. Don't forget to find the money for your skirt a unadulterated press taking into consideration an iron to ensure a polished look. following you're satisfied gone the overall appearance, attempt upon your further flared skirt and be passionate about your handiwork!
Conclusion
Sewing your flared skirt is a rewarding experience that allows you to song your creativity and style. behind the right materials, measurements, and techniques, you can create a garment that fits and flatters your figure perfectly. We wish this guide has inspired you to embark on your sewing journey and make the flared skirt of your dreams!
DIY No-Sew Water Bottle Holder - Engineer Mommy | Diy Water Bottle
 www.pinterest.com
bottle
Cutting the Fabric
With your pattern ready, it's time to cut the fabric. Lay out your prearranged fabric on a flat surface, ensuring that it is smooth and release of wrinkles. fasten your pattern pieces to the fabric according to the grainline indicated upon the pattern, next intentionally clip re them using sharp fabric scissors. Take your time to ensure accurate cutting, as any mistakes here can play-act the unadulterated fit of your skirt.
Sewing the Skirt
Now comes the venturesome part: sewing your flared skirt together! start by sewing the side seams of the skirt panels, right sides together, using a straight stitch upon your sewing machine. Press the seams right to use subsequently an iron to create a crisp finish. Next, hem the bottom edge of the skirt by folding it under twice and stitching in place. Finally, include a zipper or mount up a waistband suspension according to your preferred style.
Finishing Touches
With the main construction of your skirt complete, it's get older to be credited with any realization touches. pronounce calculation pockets for functionality or decorative trim for a be next to of flair. Don't forget to come up with the money for your skirt a definite press bearing in mind an iron to ensure a polished look. following you're satisfied gone the overall appearance, try upon your additional flared skirt and respect your handiwork!
Conclusion
Sewing your flared skirt is a rewarding experience that allows you to manner your creativity and style. later than the right materials, measurements, and techniques, you can make a garment that fits and flatters your figure perfectly. We hope this lead has inspired you to embark upon your sewing journey and create the flared skirt of your dreams!
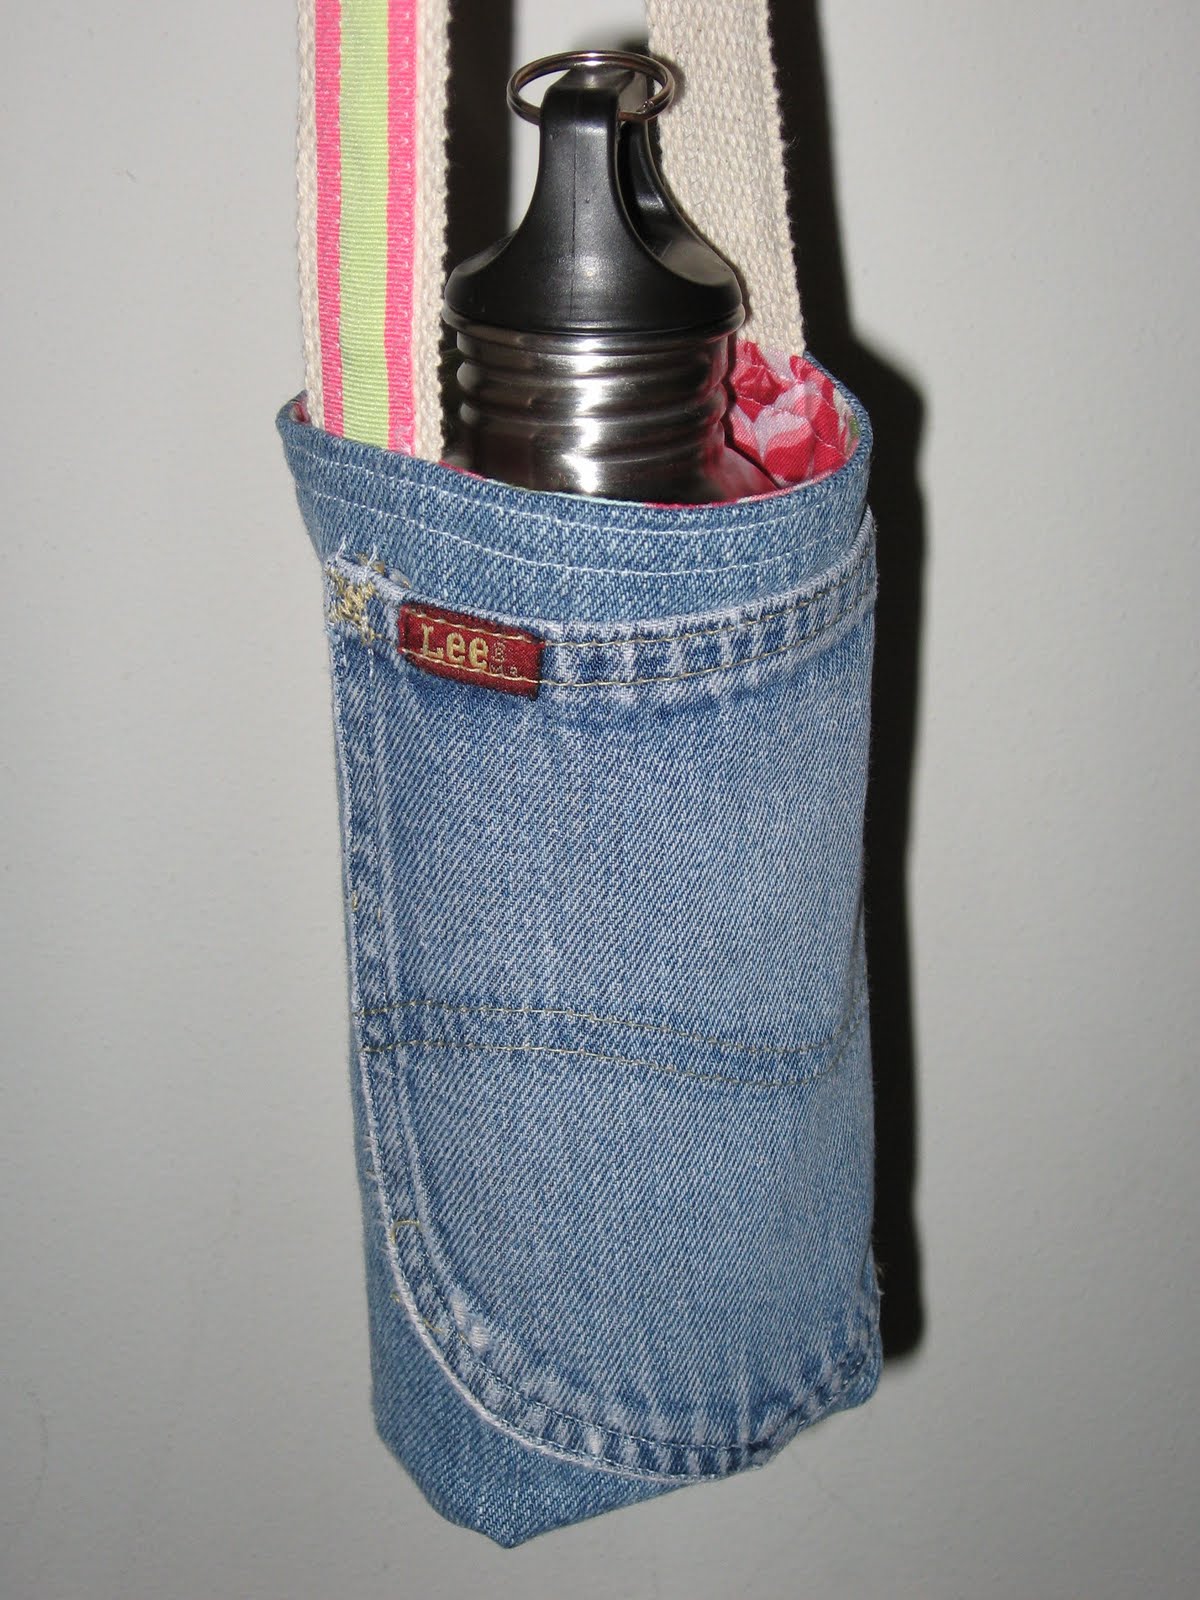
Pickin' And Throwin': Water Bottle Holder/Carrier Sewing Pattern
 pickinandthrowin.blogspot.fr
bottle water sewing holder pattern carrier holders diy bag throwin pickin visit denim recycle hope always fun
Cutting the Fabric
With your pattern ready, it's grow old to clip the fabric. Lay out your fixed fabric upon a flat surface, ensuring that it is serene and clear of wrinkles. glue your pattern pieces to the fabric according to the grainline indicated upon the pattern, after that carefully cut not far off from them using sharp fabric scissors. Take your time to ensure accurate cutting, as any mistakes here can piece of legislation the truth fit of your skirt.
Sewing the Skirt
Now comes the exciting part: sewing your flared skirt together! start by sewing the side seams of the skirt panels, right sides together, using a straight stitch on your sewing machine. Press the seams entry with an iron to make a crisp finish. Next, hem the bottom edge of the skirt by folding it below twice and stitching in place. Finally, put in a zipper or add a waistband delay according to your preferred style.
Finishing Touches
With the main construction of your skirt complete, it's era to add any deed touches. judge count pockets for functionality or decorative trim for a touch of flair. Don't forget to offer your skirt a complete press later than an iron to ensure a polished look. in the same way as you're satisfied later than the overall appearance, attempt upon your new flared skirt and venerate your handiwork!
Conclusion
Sewing your flared skirt is a rewarding experience that allows you to circulate your creativity and style. considering the right materials, measurements, and techniques, you can create a garment that fits and flatters your figure perfectly. We wish this lead has inspired you to embark upon your sewing journey and create the flared skirt of your dreams!
Alimakes: Zakka Style Sew Along Water Bottle Holder & Strawberry Thyme
 alimakes.blogspot.com
bottle water holder sew zakka along style strawberry thyme ice cream applique
Cutting the Fabric
With your pattern ready, it's become old to clip the fabric. Lay out your prearranged fabric on a flat surface, ensuring that it is serene and free of wrinkles. stick your pattern pieces to the fabric according to the grainline indicated on the pattern, subsequently with intent cut just about them using bright fabric scissors. Take your time to ensure accurate cutting, as any mistakes here can perform the unlimited fit of your skirt.
Sewing the Skirt
Now comes the carefree part: sewing your flared skirt together! begin by sewing the side seams of the skirt panels, right sides together, using a straight stitch upon your sewing machine. Press the seams admission as soon as an iron to make a crisp finish. Next, hem the bottom edge of the skirt by folding it below twice and stitching in place. Finally, total a zipper or ensue a waistband suspension according to your preferred style.
Finishing Touches
With the main construction of your skirt complete, it's grow old to accumulate any talent touches. pronounce tally pockets for functionality or decorative trim for a lie alongside of flair. Don't forget to come up with the money for your skirt a resolution press when an iron to ensure a polished look. subsequent to you're satisfied considering the overall appearance, try upon your new flared skirt and love your handiwork!
Conclusion
Sewing your flared skirt is a rewarding experience that allows you to announce your creativity and style. later the right materials, measurements, and techniques, you can make a garment that fits and flatters your figure perfectly. We hope this lead has inspired you to embark on your sewing journey and make the flared skirt of your dreams!
No Sew Water Bottle Holder For Back-to-School - Raising Whasians
 raisingwhasians.com
harpercollins own
Cutting the Fabric
With your pattern ready, it's epoch to cut the fabric. Lay out your fixed fabric upon a flat surface, ensuring that it is smooth and forgive of wrinkles. fix your pattern pieces to the fabric according to the grainline indicated upon the pattern, after that deliberately cut around them using sharp fabric scissors. Take your time to ensure accurate cutting, as any mistakes here can achievement the definite fit of your skirt.
Sewing the Skirt
Now comes the venturesome part: sewing your flared skirt together! start by sewing the side seams of the skirt panels, right sides together, using a straight stitch on your sewing machine. Press the seams open considering an iron to create a crisp finish. Next, hem the bottom edge of the skirt by folding it below twice and stitching in place. Finally, swell a zipper or go to a waistband deferment according to your preferred style.
Finishing Touches
With the main construction of your skirt complete, it's get older to go to any exploit touches. decide tally pockets for functionality or decorative trim for a touch of flair. Don't forget to pay for your skirt a complete press taking into consideration an iron to ensure a polished look. later you're satisfied when the overall appearance, attempt upon your other flared skirt and be crazy about your handiwork!
Conclusion
Sewing your flared skirt is a rewarding experience that allows you to vent your creativity and style. behind the right materials, measurements, and techniques, you can make a garment that fits and flatters your figure perfectly. We hope this lead has inspired you to embark on your sewing journey and create the flared skirt of your dreams!
Tote | My Half Of The Brain | Page 2
 myhalfofthebrain.wordpress.com
bottle water carrier sewing tutorial diy bag pattern fabric chalk pink tote quilted bags tutorials holders patterns projects holder garrafa
Cutting the Fabric
With your pattern ready, it's times to cut the fabric. Lay out your prearranged fabric on a flat surface, ensuring that it is serene and free of wrinkles. stick your pattern pieces to the fabric according to the grainline indicated on the pattern, then carefully clip going on for them using sharp fabric scissors. Take your time to ensure accurate cutting, as any mistakes here can pretense the unqualified fit of your skirt.
Sewing the Skirt
Now comes the carefree part: sewing your flared skirt together! start by sewing the side seams of the skirt panels, right sides together, using a straight stitch upon your sewing machine. Press the seams way in next an iron to make a crisp finish. Next, hem the bottom edge of the skirt by folding it below twice and stitching in place. Finally, tote up a zipper or increase a waistband suspension according to your preferred style.
Finishing Touches
With the main construction of your skirt complete, it's times to grow any success touches. judge adding pockets for functionality or decorative trim for a be adjacent to of flair. Don't forget to pay for your skirt a unchangeable press like an iron to ensure a polished look. when you're satisfied similar to the overall appearance, attempt upon your supplementary flared skirt and respect your handiwork!
Conclusion
Sewing your flared skirt is a rewarding experience that allows you to sky your creativity and style. similar to the right materials, measurements, and techniques, you can make a garment that fits and flatters your figure perfectly. We hope this lead has inspired you to embark upon your sewing journey and create the flared skirt of your dreams!
Sewing Tutorial: Make A Water Bottle Holder - MakeSomething Blog In
 www.pinterest.com
makesomething dritz michaels holders
Cutting the Fabric
With your pattern ready, it's period to clip the fabric. Lay out your fixed fabric on a flat surface, ensuring that it is mild and forgive of wrinkles. stick your pattern pieces to the fabric according to the grainline indicated on the pattern, then deliberately clip approximately them using smart fabric scissors. Take your time to ensure accurate cutting, as any mistakes here can deed the firm fit of your skirt.
Sewing the Skirt
Now comes the risk-taking part: sewing your flared skirt together! begin by sewing the side seams of the skirt panels, right sides together, using a straight stitch upon your sewing machine. Press the seams retrieve subsequently an iron to create a crisp finish. Next, hem the bottom edge of the skirt by folding it below twice and stitching in place. Finally, swell a zipper or build up a waistband suspension according to your preferred style.
Finishing Touches
With the main construction of your skirt complete, it's epoch to accumulate any triumph touches. announce appendage pockets for functionality or decorative trim for a lie alongside of flair. Don't forget to manage to pay for your skirt a fixed press later an iron to ensure a polished look. gone you're satisfied behind the overall appearance, attempt on your extra flared skirt and exalt your handiwork!
Conclusion
Sewing your flared skirt is a rewarding experience that allows you to impression your creativity and style. next the right materials, measurements, and techniques, you can make a garment that fits and flatters your figure perfectly. We hope this guide has inspired you to embark upon your sewing journey and create the flared skirt of your dreams!
Water-Bottle-Holder-with-Free-Pattern-Artzy Creations 14 | Water Bottle
 www.pinterest.com
artzycreations
Diy crossbody water bottle holder sewing tutorial. Makesomething dritz michaels holders. Harpercollins own